Wednesday, November 30, 2011

Pompom Puppet Tutorial

Pompom Puppet

Months later and I finally got around to putting together a tutorial for the pompom puppet. This would be a fun project to do with children. Bags of multi-sized pompoms with enough for twelve puppets can be found at craft stores for under five dollars. You can use a glove instead of sticks for controls. During the winter season you can find a pair of gloves (makes 2) for a dollar at a variety of stores. The tutorial as a pdf can be found here.

Saturday, October 8, 2011

Little Red Riding Hood

Little Red Riding Hood Too

My Little Red Riding Hood

Even though a health issue has been interfering with life and has kept me from posting as often as I'd like, I have been creating some fun things. Here are two different versions of Little Red Riding Hood. I participated in a swap with the theme of Little Red Riding Hood. I couldn't bear to part with these two.

Sunday, June 19, 2011

Cloth Doll-Merry Berry

Merry Berry

Merry Berry-a cute little cloth doll I made just because. This fun easy project turned in to a learning experience. Lesson learned-make your own pattern from the start. I started with a pattern I liked but... Any how I ended up making a lot of changes. Trust me she doesn't look anything like the original pattern. She does stand up on her own two feet, all ten and half inches of her. I really like the way she turned out. And here is a close-up of her face.

Merry Berry closeup-1

Wednesday, June 8, 2011

Cute Little Dollhouse

Cute Little Dollhouse-front view

Along with the other umpteen ongoing projects in my studio, I've been working on this cute little dollhouse. The basic structure is made from foam core board and illustration board scraps. Both of which originally came from the dollar store. The interior and exterior walls are covered with scrapbook paper.

Cute Little Dollhouse exterior

The windows and doors are also made from scrapbook paper.

Cute Little Dollhouse interior-2

The finished size is 6"w x 8.5"h x 4"d. Cute little things are so much fun and very addictive. Watch for pictures of the furniture and occupants.

Friday, May 13, 2011

Teacup Potholders

teacup potholders

A set of potholders made from the scraps of the apron. They were a Mother's Day gift for my mom to go with the apron.

Saturday, April 9, 2011

Bunch O' Bunnies

bunch of bunnies
Group shot of my newest for spring-bunnies by the bunch. Talk about multiplying bunnies. They might even out number the dust bunnies.


 closeup bunnies
Close up of some bunnies. Notice the cute whiskers and perky bows.


lavendar bunny
I couldn't resist some fun shots. I rummaged through my kids' old toys and found this cute playset.

Thursday, March 17, 2011

Free Bunny Puppet Pattern

Wooden Spoon Bunny Puppet.

Here's a 
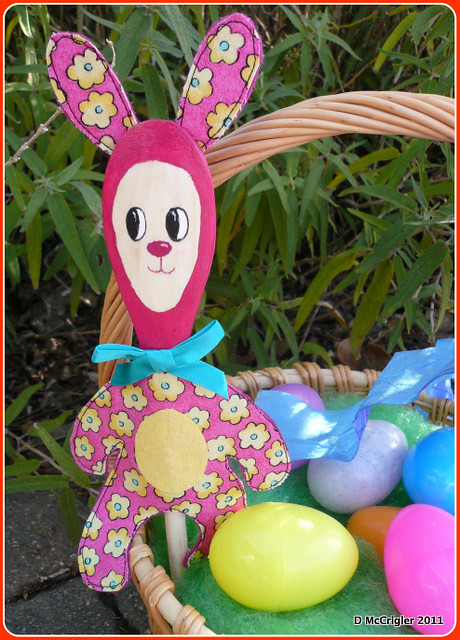
free pattern for a bunny puppet made from a wooden spoon. I wasn't planning on making wooden spoon puppets. My daughter bought several packages of wooden spoons from the dollar store for her puppet making project. Of course, when she was done she left the extras in my studio. They were just lying there saying please paint me. Not sure why I picked bunnies but I did.

About a week after I designed them, I was in Anthropology and saw the cutest display of wooden utensils with painted faces. The bamboo fork faces had spiky hair. I'm going to have to get some of those bamboo forks. They might make fun monster puppets.

Bunny Wooden Spoon Puppet

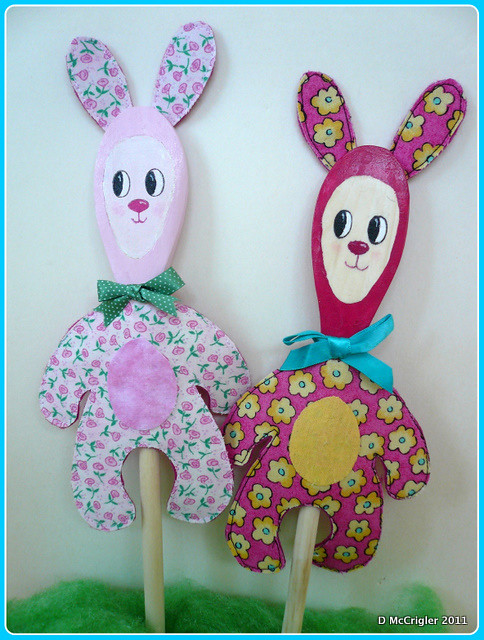
A few adjustments would make them a kid friendly project. You could glue them together except where the wooden spoon is inserted. Two layers of felt could be used instead of fabric with interfacing and one layer of felt. If you are going to make them to use in potted plants, I would use a sealer on the handle of the spoon.

Not only were these easy and fun to make. Made with a scrap of fabric, some paint, glue and a wooden spoon from the dollar store they are also a very inexpensive craft project. So there you have it, a wooden spoon bunny puppet pattern.

Wednesday, March 9, 2011

Retro Apron with Custom Bias Tape

Retro Apron

Bias tape tutorials seem to be popping up everywhere. Or maybe I've just become aware of them. I was particularly inspired by the one on Made. I knew when I found the retro looking floral print on sale along with the coordinating rick-rack striped fabric they would make a great apron. I love bias binding made from striped fabrics. Of course, in my magic studio (if you can find it) I happened to have the bias tape making gadget. I did not buy it. Like most things in there it magically appeared. Anyway the long and short of it is that I needed a birthday present for my mother. This here is the result.

Saturday, February 26, 2011

And the Winner is...

Thank you for all the comments. All the different names were wonderful. I love naming things. It gives me a such a sense of connection.

Drum roll..

The winner is jmbmommy.

I factored in the comments from the previous post. There was a bit of confusion at the start. I would have actually have put a picture of the random number generator I used but due to technical difficulties on my part that just won't happen. Anyway, jmbmommy, I will contact you. Here is a picture of the actual prize with it's gift bag. Hope you like it.

Ladybug Brooch with gift bag

Monday, February 21, 2011

Giveaway-Ladybug Brooch

Ladybug brooch-close up
It seems I missed a great brooch swap at Creative Kismet. Embellished brooches are one of my specialties. I love making them. I love wearing them. So to make up for not being able to participate in the swap, I"ve decided to participate in the giveaway part of the swap.

Here are the details. I'm giving away this cute ladybug brooch. It's my newest. She could use a name. So please, for a chance to win a ladybug brooch wrapped in a cute gift bag, similar to the one in the previous post, please leave a suggestion for a name. Winner will be picked at random on Friday, Feb 25th. Thanks.

Monday, February 14, 2011

Ladybug Brooch and Gift Bag

Love Bug and Gift Bag
My oldest daughter really like ladybugs. I thought a ladybug brooch would make a great Valentine's Day present for her. I went through four different patterns before I decided on the second pattern I had designed. The black fabric seemed to have a mind of its own. It definitely stretched some. Oh well, next time I rework the pattern I will have to deal with that. I also made a small gift bag to put it in. My youngest daughter commented that the weeds in the backyard made a great backdrop for the photo. Nice to know they're good for something.

Saturday, February 5, 2011

World Nutella Day- Nutella Stuffed Scones

Nutella Stuffed Scones
February 5th is World Nutella Day. What better way to celebrate than to make Nutella Stuffed Scones. So easy and so yummy. Basically I made a batch of my favorite chocolate scones, cut a slit in the top, enlarged the slit a bit and dropped a small spoonful of nutella into the opening. Bake as usual. More yummy nutella recipes can be found at the World Nutella Day website.

Saturday, January 29, 2011

I Can See Clearly Now-Well I Could Then

January a time for renewal and cleaning. Yep, I finally thoroughly cleaned and reorganized my studio. For the first time in months you could actually see the flat surfaces, walk through the room without hopping over the piles and find those lost works in progress. Everything got put away in its proper place. This means I will probably spend a lot of time looking for everything because it's not where I remember leaving it.

Of course it's always hard to start a new project in a clean space. You don't want to make a mess after spending many, many, many hours cleaning it. But this is no longer a problem. My daughter cut out a puppet from black long pile faux fur. Let me tell you, it makes more black dust bunnies than the dog ever did. I'll be vacuuming up black fuzzies for a long time. They even float out the front door. (I vacuumed a bunch off the outside front door mat.)

Good thing I took this picture on the very day I finished cleaning it.


Friday, January 14, 2011

Plushie Group Photo

I just listed these cuties on Artfire. They insisted I post a group photo before they get adopted out to different homes.